

A: power connector
- dashcoder needs a 12volts stabilised power supply DC (5,5mm, positive inside). Please do not use a supply with less than 12volts or less than 1ampere outgoing current if you want to write flash area by dashplug
- this connector ill not be used by obd programming
B: pc connection
- this port can be used to connect the dashcoder to pc to update the dashcoder or for uploading data from dashcoder to pc. It can be used too, to connect the dashcoder to additional hardware (dc450,912tool,cas4tool).
- please do not use a serial to usb adapter
C: dashcoder system-connector
- here you have to connect the target specific hardware to connect the dashcoder to different mcu’s or memories
power on
- after connecting the dashcoder to a power supply or to a car with the obd cable the unit begins to boot. After some seconds you can see the start screen with the serial number and the hw/sw version with the esc button you can turn the background light on and off.
- with the ok button you reach the main menu the dashcoder needs a password now . Originally it is set to 000000. in the main menu under options you can set a new password
the main menu
- here you can find all car models,pc com,options and the device programmers standard menu(bauteilbibliothek) this contains all programmable chip types but no support for decoding/encoding to get to the desired point please use the arrow up and down key „⇑“ „⇓“then press ok
- to get back please use the esc button if you want to jump down on complete screen please use the button “3”
Menu
Menu „OPTIONS“
- Version
- the actual sw version will be shown here
- Language
- the users language can be changed here
- Password
- to set password on/off
- new password
- to change your current password
- you have to give in the old one then you can set a new password.
- The new password is set after confirmation
- delete all eeps
- this function deletes all stored eep data in dashcoder
- we recommend do backup data on pc before you will do this
- delete last eep
- only the last stored eep file will be deleted
- logger not for official use
- ask for support
- unlock
- function not in use new cars only by updating online
- cantest
- self-check for internal can hardware
- update_OBD
- with the connected multi obd cable you can update the firmware in the obd connector
- the actual firmware of the obd connector will be shown
- every time you will use this cable
- remote
- remote control only with blue tooth or umts module inside
Menu „support“
- phone number email and skype for technical support
Menu „PC-COM“
- to connect the dashcoder to pc (communication mode) updating /send and receive data
Menu „Bauteilebibliothek“ (for experienced users)
- in this menu all programmable devices will be shown
- reading and writing of all listed devices
- no support for decoding
- two possibilities to write all
- → write complete
- to write a small area only:
- go to change mileage, set zero as new mileage then press „OK“
- now you will be asked for the beginning address in hex.
- After pressing OK you will be asked for the end address if you press OK the dashcoder writes only the desired areas from buffer to memory
Methods of programming
Diagnose / OBD
- you use the dashcoder via connection cable first connect dashcoder to multi obd cable then with the cars obd connector
- turn the ignition on and use the right car in your menu in most cases the old mileage will be shown.
- If the shown value is not correct please check the car specific manual before programming
- in some cases it helps to disconnect the battery and connect it again before a second try.
- Another cause for failure is often a bad battery power level of the car.
dashplug dashboard
- will only be programmed with a connection cable directly from dashcoder.
- in most cases the old mileage will be shown.
- If the shown value is not correct please check the car specific manual before programming
soldering
- in this case you have to solder one of the cables or adapters belonging the car specific manual
- attention: do not solder with power on or dashcoder connected serious damaged to all units may result
- after you have verified all connections you can power the dashcoder on. You can program the dashboard according the car specific manual now.

EEProm
- in some cars the memory is external and can be programmed directly by clip
- here are some examples for them

Pin No, 1 of the eep is always marked in one of the examples
- above do not continue if you are not sure.
- ask support for help
- Programmer can be damaged and data loss may result in wrong use

there different types of memories for every family the is a specific port you have to use the correct port.


available ports/chip types
PORT24 for all types beginning with 24… → (e.g. 24C04, 24C16, 24C64)
PORT93 for all types beginning with 93… → (e.g. 93SC46, 93S56, 93C86)
PORT95 for all types beginning with 95 or 25 → (e.g. 95160, 95128, 25320)
PORT35 for all types beginning with 35 → (e.g. 35080, 35160 also 080D0QW and 160D0QW)
Attention! wrong use may damage your hardware!
For best results in programming please:
- clean the eep contacts
- if you try to program in circuit please make a bridge with a cable to the oscillator if you want to be absolutely sure we recommend to de-solder the eeprom
- please check the car specific manual before. some cars can not be programmed in circuit
Here are some examples for oscillators

EEPrommenü

show/edit → a complete hex-editor
read eep → read eep again and decode the mileage
save → saves the data as shown in dashcoder the name can be edited by the user
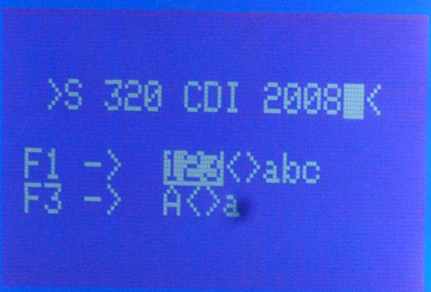
Button „F1“ changes between numbers and letters
Button „F3“ changes between small and big letters in letters modes and change the position → ← and ↑ and ↓ change the letter
change km → change mileage value
charge/load → to get data from dashcoders memory to buffer
write all → all data from buffer (visible in hexeditor) will be written to memory
compare → data in memory will be compared with data in connected eep
delete → (onlyM35080) mileage area will be set to zero (not35080V6/080D0QW use eraser 35xx)
KM / miles converting – to change shown mileage from km to miles or back just press button “c”
93Cxx 8-bit mode / 16-bit mode to read an eep in 8 or 16bit mode: → when the machine shows please put the clip on the chip xx just press the button „8“
ONLY 93Cxx EEPROMS
example above:
when in data field no value is bigger then 7 you should try to read again in 8bit mode
7FFF 7FFF 7FFF 7FFF
3654 7F1F 14E3 7E12
…. …. …. ….
Hexeditor
the hexeditor has two modes of operation
scroll mode and edit mode
commands in scroll mode are:
up, down,left,right with the buttons 2,4,6 and 8
- to go page up/down button 3,9
- to go 5 pages down please use button 1
to change from scroll to edit mode please use the button esc
now you can change data at the marked position.
The actual position in data field will be shown on the bottom.
After pressing esc again you can leave to eep main menu and save data or write directly with write all to eep
special function flip bytes:
sometimes repair data come from other programming devices in this case you can flip data by pressing the button “f” while showing data in editor.
Interested in the Dashcoder?
If you are ready to buy or have any questions , do contact us.
We will be happy to answer your questions.